Jira Integration & Graphical Test Builder
We are proud to announce the release of two new features, available immediately. 🚀 Jira Integration: Automate Issue Tracking for...
In an era where data is growing exponentially, the ability to scale databases efficiently and effectively is paramount. MongoDB, a popular NoSQL database, offers a powerful mechanism called "sharding" to address the scalability needs of modern applications. This section provides...

In an era where data is growing exponentially, the ability to scale databases efficiently and effectively is paramount. MongoDB, a popular NoSQL database, offers a powerful mechanism called "sharding" to address the scalability needs of modern applications. This section provides an overview of what sharding is, why it is essential for scalable MongoDB deployments, and the specific problems it helps solve.
Sharding is a method of distributing data across multiple machines, allowing MongoDB to handle large datasets and high throughput operations by scaling horizontally. Instead of keeping the entire dataset on a single server, sharding breaks the dataset into smaller, more manageable pieces called shards, each stored on different servers.
As applications grow, the amount of data they handle increases, often leading to performance bottlenecks and storage limitations on a single server. Sharding offers the following key benefits:
Scalability:
Improved Performance:
High Availability:
Sharding helps resolve several critical issues encountered in large-scale MongoDB deployments:
Data Volume:
Query Performance:
I/O Constraints:
Network Limitations:
Here's a simplified illustration of how sharding reorganizes a dataset:
// Initial Monolithic MongoDB Deployment
Database: orders
---------------------------------------
| OrderID | CustomerID | Product | ... |
| 1       | 123        | A       | ... |
| 2       | 124        | B       | ... |
...

// After Sharding the Dataset
Shard 1
---------------------------------------
| OrderID | CustomerID | Product | ... |
| 1       | 123        | A       | ... |

Shard 2
---------------------------------------
| OrderID | CustomerID | Product | ... |
| 2       | 124        | B       | ... |
...
In this example, the orders collection is divided into multiple shards, with each shard responsible for a subset of the data. This distribution helps in handling larger volumes of data efficiently and ensuring that queries execute faster.
In conclusion, sharding is a fundamental technique for scaling MongoDB. It addresses critical challenges related to data volume, query performance, I/O constraints, and network limitations, providing a robust foundation for building and maintaining large-scale applications. As we move forward, we'll explore the prerequisites for implementing sharding and delve deeper into the intricacies of how sharding works within MongoDB.
Before diving into the intricacies of setting up a sharded MongoDB cluster, it is crucial to assess and prepare the necessary hardware, software, and network components. Ensuring that you have these prerequisites in place will streamline the process of sharding and contribute to a robust and scalable MongoDB deployment.
Servers for Shards
Config Servers
Mongos Routers
MongoDB Version
Operating System
Network Configuration
Bandwidth
Latency
Security
Data Assessment
Resource Planning
Backup Strategy
Testing Environment
# Start config servers with required parameters
mongod --configsvr --replSet configReplSet --dbpath /data/configdb --port 27018 --bind_ip_all
# Start mongos instance and connect to config servers
mongos --configdb configReplSet/hostname1:27018,hostname2:27018,hostname3:27018 --port 27017 --bind_ip_all
In conclusion, laying the groundwork with appropriate hardware, software, and network configurations is essential for a successful sharded MongoDB deployment. Proper preparation minimizes potential challenges and ensures a smooth transition to a scalable database architecture.
In a modern application, scaling out your database to meet high throughput demands is a critical requirement. In MongoDB, sharding is the key feature that allows horizontal scaling by distributing data across multiple servers. This section provides an in-depth look at the architecture and components involved in MongoDB sharding.
The first step in implementing sharding is selecting an appropriate shard key. A shard key is a field or a combination of fields that determine how data is distributed across shards. Choosing the right shard key is crucial for balanced data distribution and efficient query execution.
Example of creating a shard key:
db.collection.createIndex({ "myShardKey": 1 })
db.adminCommand({ shardCollection: "myDatabase.myCollection", key: { "myShardKey": 1 } })
Shard servers are the nodes that store the actual data. Each shard is essentially a separate MongoDB replica set, which includes primary and secondary members that provide redundancy and high availability.
Config servers store metadata and configuration settings for the sharded clusters, including the mappings of which data resides on which shard. Usually, config servers are deployed as a replica set to ensure high availability.
Mongos instances act as query routers. MongoDB clients connect to a mongos instance, which then routes the read and write operations to the appropriate shard based on the shard key.
Here's a simplified architecture diagram representing sharding in MongoDB:
           +------------+
           |            |
           |  Client    |
           |            |
           +-----^------+
                 |
         +-------+-------+
         |               |
     +---v----+   +------v----+
     | Mongos |   |   Mongos  |
     +--------+   +------^----+
                  | this is a sharded cluster
                  |
          +-------+-------+
          |  Config Servers|
          +------+-------+--+
                  |       |
                 /         \
        +-------+           +------+
        | shard 1|           |shard 2|
        +-------+            +------+
Understanding how sharding works in MongoDB is crucial for designing scalable, high-performance applications. By carefully selecting shard keys and setting up shard servers, config servers, and mongos routers, you can horizontally scale your MongoDB deployment to meet increasing data and traffic demands.
In subsequent sections, we'll explore in-depth techniques on optimal shard key selection, step-by-step setup guides, and best practices for maintaining and scaling your sharded clusters.
Selecting the right shard key is one of the most critical decisions you'll make when configuring a sharded MongoDB cluster. The shard key determines how your data is distributed across various shards, directly impacting both performance and scalability. This section will guide you through the intricacies of choosing an optimal shard key, ensuring balanced distribution and efficient data retrieval for your MongoDB deployment.
A shard key is a field or a combination of fields used to split your data into chunks, which are then distributed across different shards. The choice of a shard key affects:
A well-chosen shard key should have the following properties:
{"region": 1, "customerId": 1} can help partition data by region and further by customer ID within each region.{ "field1": 1 }
{ "field1": 1, "field2": 1 }
High cardinality fields like unique user IDs or timestamps are excellent choices since they ensure data is spread across multiple shards.
Avoid shard keys that are monotonically increasing, such as timestamps or auto-incrementing IDs. These can result in all insert operations targeting a single shard, leading to imbalanced distribution and potential performance issues.
The shard key should match your common query patterns to minimize the number of shards accessed during a query. For example, if queries frequently filter by user IDs, using user ID as part of your shard key is beneficial.
For write-heavy workloads, choose a shard key that helps evenly distribute writes to avoid overloading a single shard.
High Cardinality Field Example
{ "userId": 1 }
This key is ideal for applications where operations frequently involve a unique user, ensuring even distribution across shards.
Compound Key Example
{ "region": 1, "orderId": 1 }
This key combines region to localize data and orderId to ensure uniqueness within each region, balancing read and write loads.
Bad Shard Key Example
{ "createdAt": 1 }
A createdAt field is not optimal as it tends to be monotonically increasing, which can funnel most of the write traffic to a single shard.
Selecting the right shard key is essential for ensuring balanced distribution and efficient data retrieval in a sharded MongoDB cluster. By considering factors like high cardinality, avoiding monotonically increasing values, aligning with query patterns, and balancing write workloads, you can optimize your MongoDB environment for scalability and performance. Additionally, testing your choice using LoadForge can help identify potential bottlenecks and confirm your selection under real-world conditions.
In this section, we will walk you through the step-by-step process of setting up a sharded MongoDB cluster. This includes creating and adding shards, and configuring the mongos routers and config servers. Follow along to ensure a smooth and efficient deployment of your sharded MongoDB environment.
First, ensure that MongoDB is installed on all nodes that will participate in the sharded cluster. This includes shard servers, config servers, and mongos instances.
Config servers store the metadata and configuration settings for the cluster. Typically, you should have three config servers for redundancy and reliability.
Start each config server using the following command:
mongod --configsvr --replSet cfgReplSet --dbpath /path/to/your/configdb --bind_ip localhost --port 27019
Connect to one of the config servers and initialize the replica set.
mongo --port 27019
rs.initiate(
  {
    _id: "cfgReplSet",
    configsvr: true,
    members: [
      { _id: 0, host: "cfg1.example.com:27019" },
      { _id: 1, host: "cfg2.example.com:27019" },
      { _id: 2, host: "cfg3.example.com:27019" }
    ]
  }
)
Shard servers are the primary data storage components in a sharded cluster. Start each shard server with a similar command:
mongod --shardsvr --replSet shard1 --dbpath /path/to/your/sharddb --bind_ip localhost --port 27018
Each shard should be configured as a replica set for high availability. Connect to one of the shard servers and initialize the replica set:
mongo --port 27018
rs.initiate(
  {
    _id: "shard1",
    members: [
      { _id: 0, host: "shard1a.example.com:27018" },
      { _id: 1, host: "shard1b.example.com:27018" },
      { _id: 2, host: "shard1c.example.com:27018" }
    ]
  }
)
Repeat this step for each shard in your cluster.
mongos instances act as query routers, directing client requests to the appropriate shards. Start mongos on each routing server:
mongos --configdb cfgReplSet/cfg1.example.com:27019,cfg2.example.com:27019,cfg3.example.com:27019 --bind_ip localhost --port 27017
Connect to one of the mongos instances and add your shards to the cluster:
mongo --port 27017
sh.addShard("shard1/shard1a.example.com:27018,shard1b.example.com:27018,shard1c.example.com:27018")
Repeat for each shard in your cluster.
Enable sharding on the database and specify the shard key for a collection:
use myDatabase
sh.enableSharding("myDatabase")
sh.shardCollection("myDatabase.myCollection", { shardKeyField: 1 })
By following these steps, you will have successfully set up a sharded MongoDB cluster. This setup ensures that your data is distributed across multiple shards, enhancing scalability and performance. Be sure to proceed to the next sections for tips on monitoring, maintaining, and expanding your sharded cluster.
Choosing the right shard key is one of the most critical decisions when implementing sharding in MongoDB. The shard key dictates how the data is distributed across shards and greatly impacts the performance and efficiency of the operations. This section presents real-world examples and use cases to help understand the implications of different shard key choices and their impact on performance.
Consider an e-commerce application where the database handles a large volume of products and user transactions. Key operations include searching for products, processing user orders, and retrieving user-specific information.
Product ID:
shardCollection("ecommerce.products", { "productID" : "hashed" })
Category:
shardCollection("ecommerce.products", { "category" : 1 })
User ID for Transactions:
userID might increase read/write latency for user-specific data.shardCollection("ecommerce.transactions", { "userID" : 1 })
Consider a social media platform where massive amounts of user-generated content, such as posts and comments, are stored and retrieved. Key operations include fetching user posts, fetching trending posts, and storing comments.
User ID for Posts:
shardCollection("social.posts", { "userID" : "hashed" })
Post ID for Comments:
shardCollection("social.comments", { "postID" : "hashed" })
Timestamp for Trending Posts:
shardCollection("social.trendingPosts", { "timestamp" : 1 })
For an Internet of Things (IoT) application where sensors send data to the database at regular intervals, managing vast amounts of time-series data efficiently is crucial.
Sensor ID:
shardCollection("iot.sensorData", { "sensorID" : "hashed" })
Timestamp:
shardCollection("iot.sensorData", { "timestamp" : 1 })
When choosing a shard key:
Choosing an optimal shard key is a balancing act. You need to carefully analyze your application's data and access patterns to make an informed decision that ensures scalability and performance.
Through these examples, you can see how different choices impact the database's efficiency and balance. Understanding your specific use case and choosing the right shard key is crucial in achieving a robust and scalable MongoDB deployment.
Sharding is a powerful tool for scaling MongoDB, but implementing it incorrectly can lead to numerous issues that hamper performance and reliability. This section outlines common pitfalls encountered during the sharding process and provides strategies for avoiding them to ensure a robust and efficient sharded database.
Choosing an inappropriate shard key is one of the most critical mistakes you can make. It can lead to unbalanced data distribution, increased query latency, and added complexity in query routing.
Example: Choosing a balanced Compound Shard Key
db.collection.createIndex( { "customer_id": 1, "order_id": 1 } )
sh.shardCollection( "ecommerce.orders", { "customer_id": 1, "order_id": 1 } )
Inefficient data distribution can occur if chunks are not properly balanced across shards, leading to some shards being over-utilized while others are under-utilized.
Example: Manually Triggering the Balancer
sh.startBalancer()
Sharding introduces operational overheads such as increased complexity in query routing and additional network I/O between shards.
Example: Creating an Index that Supports Sharded Queries
db.collection.createIndex( { "field1": 1, "field2": -1 } )
Mongos routers are responsible for directing queries to the appropriate shards. Misconfiguring them can result in inefficient query routing, thereby degrading performance.
Example: Adding a New Shard to Mongos Configuration
sh.addShard( "rs1/mongodb0.rs1.example.net:27017" )
Failing to plan for failover can lead to extended downtimes and data inconsistency issues during node failures.
Example: Configuring a Replica Set
rs.initiate(
   {
      _id: "rs0",
      members: [
         { _id: 0, host: "mongodb0.example.net:27017" },
         { _id: 1, host: "mongodb1.example.net:27017" },
         { _id: 2, host: "mongodb2.example.net:27017" }
      ]
   }
)
A sharded cluster requires consistent monitoring and maintenance to ensure ongoing performance and reliability.
Example: Using mongostat for Real-Time Monitoring
mongostat --host mongodb0.example.net:27017 --discover
By being aware of these common pitfalls and using the strategies provided, you can avoid many of the issues that can arise in a sharded MongoDB implementation. This will help ensure you maintain a high-performance, scalable, and robust MongoDB cluster.
Monitoring and maintaining a sharded MongoDB cluster is crucial to ensure optimal performance, immediate detection of issues, and seamless operation. This section covers best practices for keeping an eye on the health of your sharded cluster and performing routine maintenance tasks to prevent problems.
Effective monitoring helps you to quickly spot anomalies and prevent performance degradation. Below are key areas to focus on:
Resource Utilization:
MongoDB Metrics:
Shard Health:
Logs:
Several tools and commands can assist with effective monitoring and maintenance:
MongoDB Monitoring Tools:
mongostat: Provides a quick overview of the status of a MongoDB instance.mongotop: Shows the time a MongoDB instance spends reading and writing data.Sample Commands:
Check Balancer Status:
sh.getBalancerState()Check Chunk Distribution:
sh.status({verbose:1})Monitor Current Operations:
db.currentOp()Check Server Status:
db.serverStatus()Query Performance:
db.system.profile.find({ millis: { $gt: 100 } }).sort({ ts: -1 })Regular maintenance is essential for a healthy sharded cluster. Here are some routine tasks:
Index Management:
Configuration Updates:
Balancing Operations:
Log Rotation:
Backup and Restore:
Alerts:
Automated Tasks:
By following these best practices, you can ensure that your sharded MongoDB cluster remains healthy, performant, and scalable to meet your application's demands. Proactive monitoring and regular maintenance are key to avoiding unexpected issues and ensuring smooth operations.
Backups and recovery are critical components in maintaining the integrity and availability of your data in a sharded MongoDB environment. In this section, we will explore various strategies and tools to ensure that your data is reliably backed up and can be swiftly restored in case of failures or data corruption. Let's dive into the steps and best practices for efficient backup and recovery in a sharded MongoDB cluster.
Backups can be categorized into several types, each suited for different scenarios. Below are the common strategies used in a sharded MongoDB environment:
Snapshots:
Mongodump:
mongodump is a MongoDB utility that performs a logical backup of the data by dumping information directly from the database layer.Continuous Backup:
Several tools can be utilized for backups in a sharded MongoDB environment:
Mongodump and Mongorestore:
# Use mongodump to back up data
mongodump --uri="mongodb://mongos_router:27017" --out /backup/dump --oplog

# Use mongorestore to restore data
mongorestore --uri="mongodb://mongos_router:27017" /backup/dump
Ops Manager/Cloud Manager:
Filesystem Snapshots:
Recovering data efficiently is as important as taking the backups. These are the steps for common recovery scenarios:
Restoring Data from Snapshots:
Using Mongorestore:
mongorestore utility to restore the backed-up data:mongorestore --uri="mongodb://mongos_router:27017" /backup/dump
Point-in-Time Recovery with Ops Manager:
Adhering to certain best practices can greatly improve the reliability of your backup and recovery processes:
Test Your Backup and Recovery Plans: Regularly test your backups to ensure they can be restored successfully without data loss.
Automate Backups: Schedule regular backups to avoid manual errors and ensure consistency.
Monitor Backup Jobs: Use monitoring tools to oversee backup processes and get alerted in case of failures.
Use Replica Sets: Ensure that each shard is a replica set to have redundancy and enable seamless backup without downtime.
In a sharded MongoDB environment, having a robust backup and recovery plan is paramount for data integrity and availability. By employing the strategies and tools outlined above, you can safeguard your data against loss and expedite recovery in case of failure. Remember to continuously refine your approach based on evolving data needs and infrastructure changes.
As your data and user load grows, scaling out your MongoDB deployment horizontally by adding more shards becomes essential to maintaining performance and reliability. This section provides detailed guidelines on how to effectively add new shards to your MongoDB cluster, ensuring a smooth and efficient expansion.
Before scaling out, evaluate the current performance of your cluster. Look for indicators such as:
Proper preparation is crucial for seamless integration of new shards. Ensure the following prerequisites are met:
Deploy and start the MongoDB instances that will act as the new shard servers. They need to be configured similarly to your existing shard servers.
# Start a new MongoDB instance to be used as a shard
mongod --shardsvr --replSet --port --dbpath /data/db If using replica sets (recommended for production environments), initialize the new shard's replica set.
# Connect to the new shard instance
mongo --port

# Initialize the replica set
rs.initiate({
  _id: "",
  members: [
    { _id: 0, host: "hostname:port" }
  ]
})
Using the mongos router, add the new shard to the existing sharded cluster.
# Connect to mongos instance
mongo --host  --port

# Add the new shard
sh.addShard("/:")
Once the new shard is added, MongoDB will automatically start rebalancing the data. You can monitor the progress using the following command:
# Check data distribution status
sh.status({ includeAllShardDetails: true })
Challenge: Data migration causing high load and affecting performance.
Challenge: Uneven shard key distribution.
By following these guidelines, you can effectively scale your MongoDB deployment horizontally, ensuring that your database can handle increased data volumes and user traffic. In the next section, we'll focus on load testing your sharded MongoDB cluster using LoadForge to evaluate its performance under various workloads and identify potential bottlenecks.
Load testing is a critical step in understanding and optimizing the performance of a sharded MongoDB cluster. By applying various workloads, you can uncover potential bottlenecks and ensure your system can handle high demand. In this section, we will guide you through using LoadForge to effectively test your sharded MongoDB cluster.
Load testing helps to:
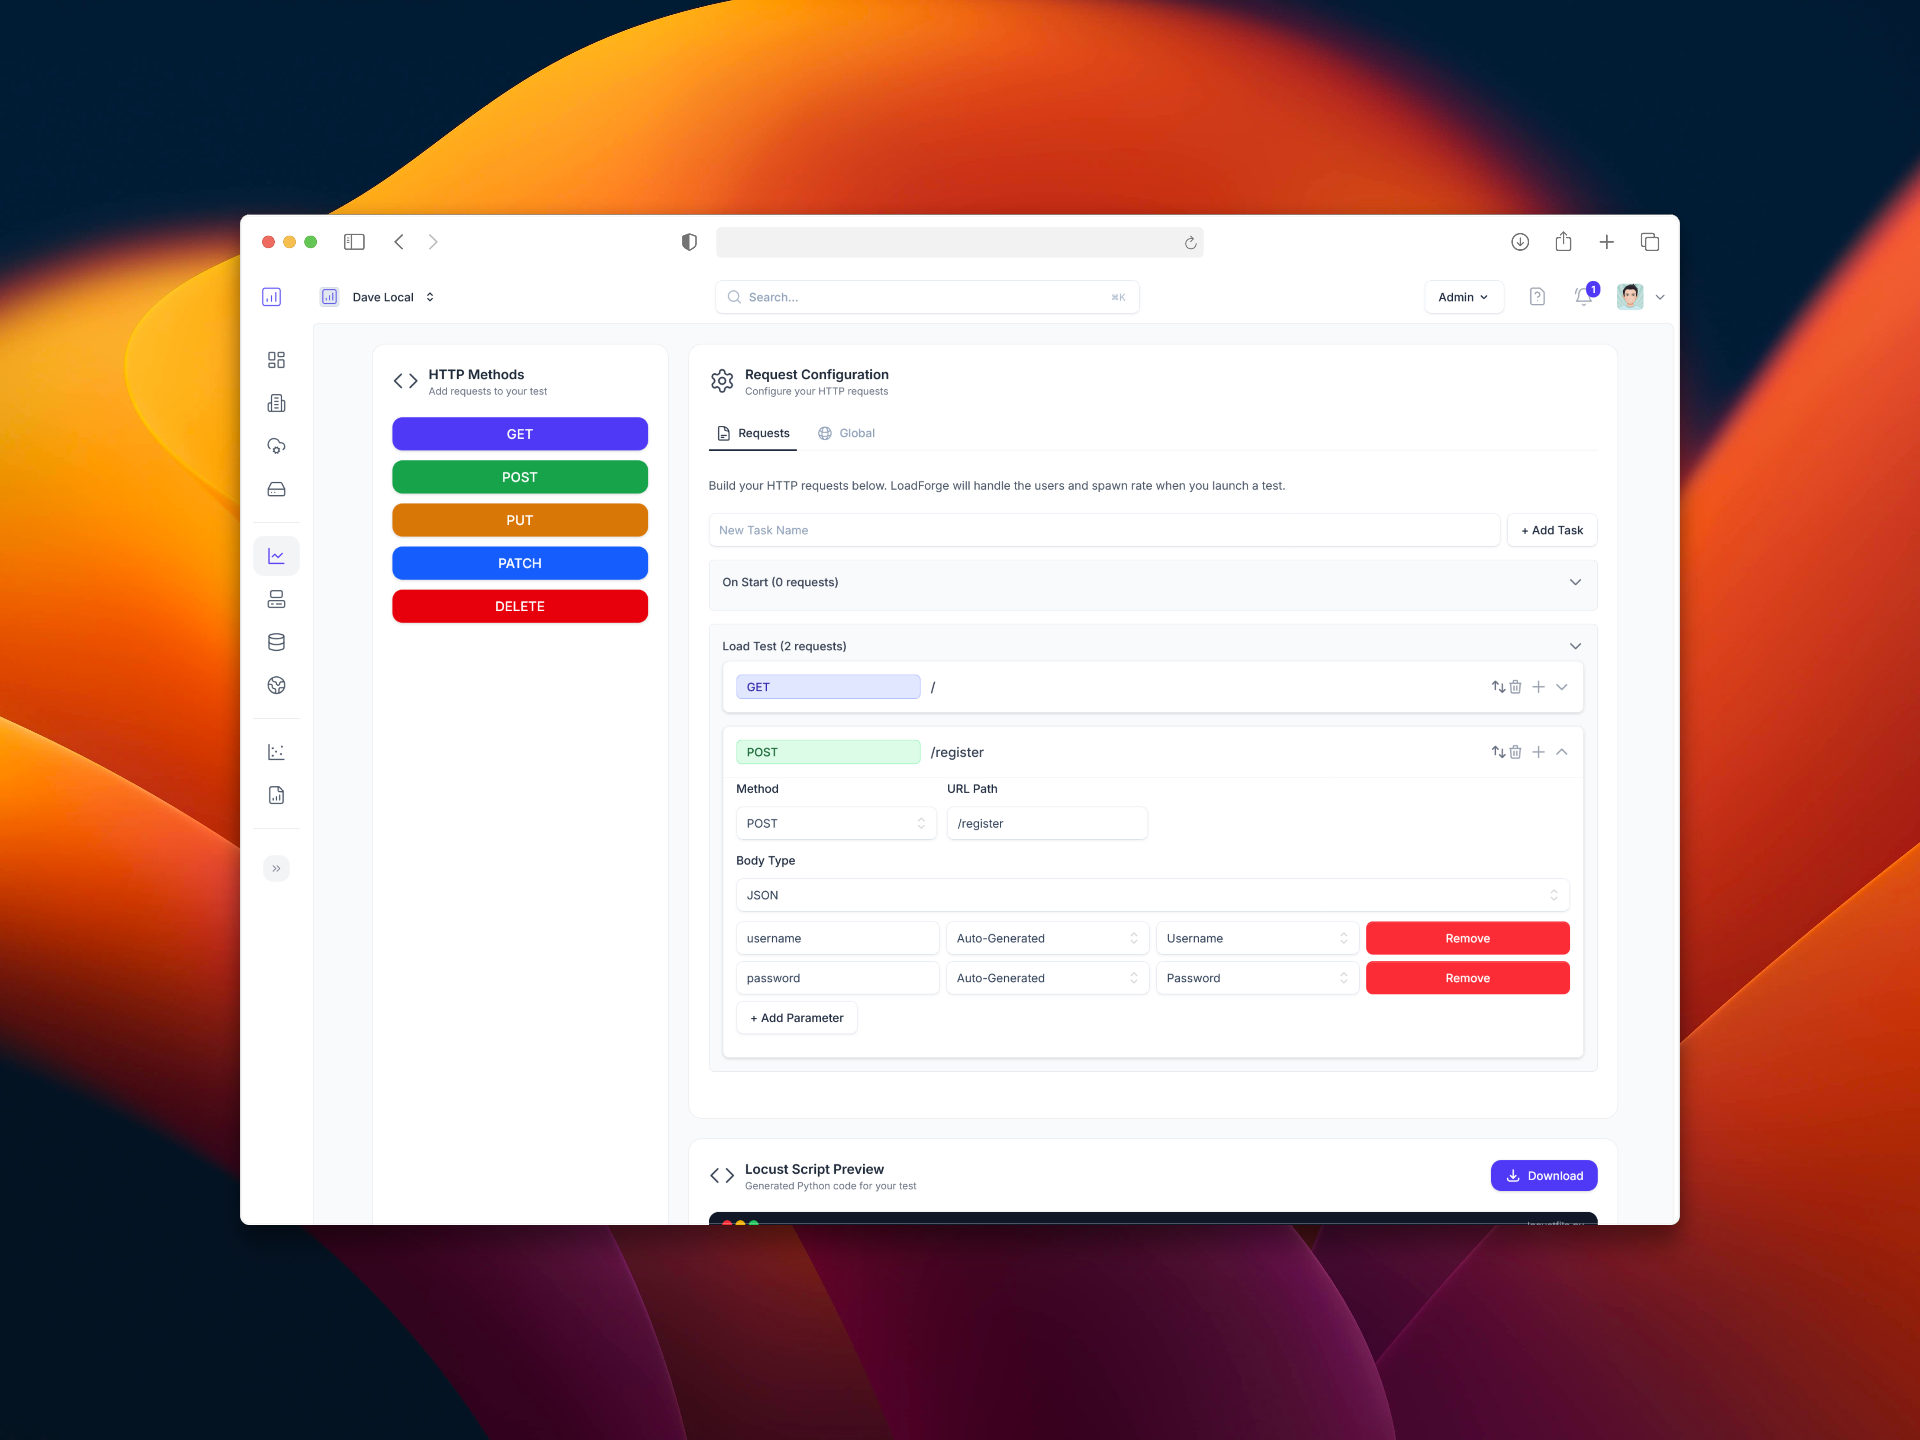
To begin load testing, you need to set up LoadForge, a powerful tool for simulating various workloads. Here's how to do it:
First, sign up for a LoadForge account if you haven't already. You can do this by visiting the LoadForge website and following the registration instructions.
Define your test scenarios based on typical operations that your MongoDB cluster handles. Examples include:
Create a testScript.js to simulate these operations:
const { MongoClient } = require('mongodb');

const uri = "mongodb://username:password@mongos_router1,mongos_router2/?replicaSet=myReplicaSet";
const client = new MongoClient(uri);

async function loadTest() {
    try {
        await client.connect();
        const database = client.db('testDB');
        const collection = database.collection('testCollection');

        // Simulate read operation
        for (let i = 0; i < 1000; i++) {
            await collection.find({ shardKey: `key${i}` }).toArray();
        }

        // Simulate write operation
        for (let i = 0; i < 1000; i++) {
            await collection.insertOne({ shardKey: `key${i}`, value: `value${i}` });
        }

        // Simulate complex query
        await collection.aggregate([
            { $match: { shardKey: { $regex: "^key" } } },
            { $group: { _id: "$shardKey", total: { $sum: "$value" } } }
        ]).toArray();
    } finally {
        await client.close();
    }
}

loadTest().catch(console.error);
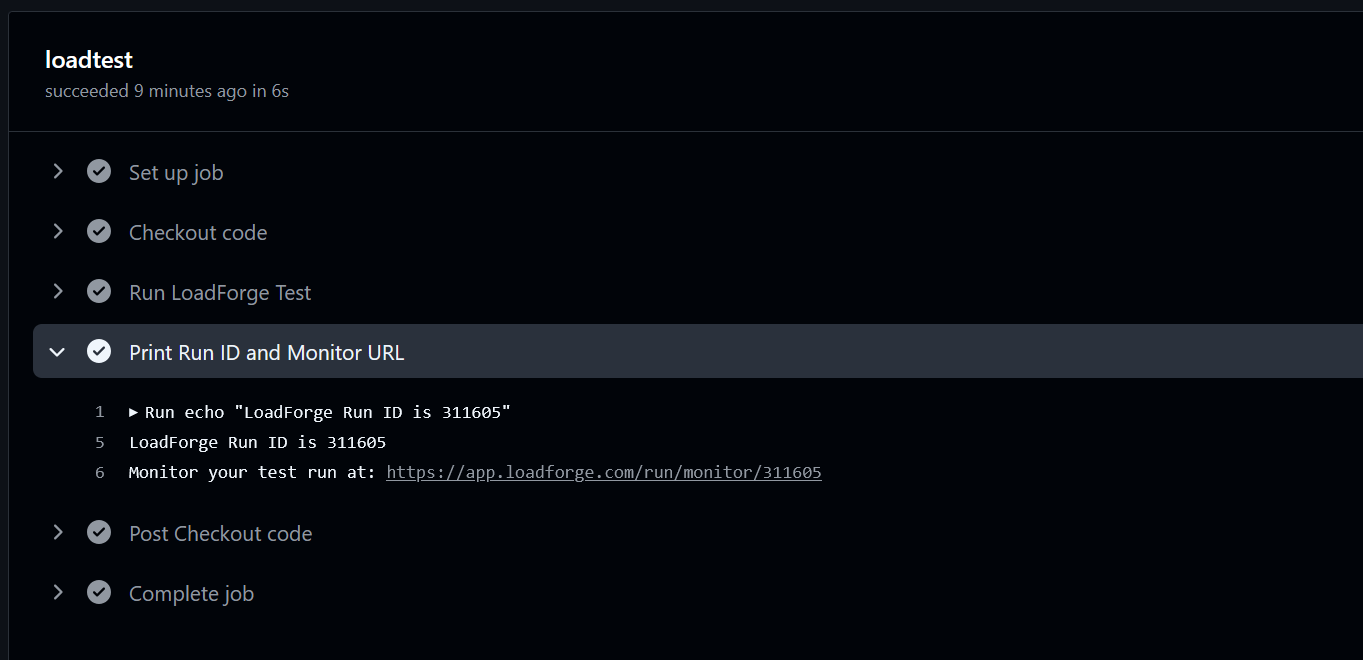
testScript.js to LoadForge.After running your load tests, LoadForge will provide detailed reports on various performance metrics:
Use the insights from LoadForge to identify areas needing improvement. Common bottlenecks include:
Load testing is not a one-time effort. Regularly perform load tests, especially before major deployments or after significant changes to your cluster. Continuous testing ensures your MongoDB deployment remains robust and performant as your data scales.
By leveraging LoadForge for load testing, you can ensure your sharded MongoDB cluster operates efficiently under varying workloads. This proactivity aids in maintaining high availability and performance, directly contributing to a better user experience and operational stability.
In this section, we delve into real-life case studies of companies that have successfully implemented sharding in MongoDB. These examples highlight their unique challenges, the solutions they employed, and the outcomes of their sharding implementations. By understanding these scenarios, you'll gain insights that could help you overcome similar challenges in your own MongoDB deployments.
An e-commerce platform with millions of daily active users was experiencing performance bottlenecks as their user base grew. Search queries and transaction processing times were increasing, resulting in a poor user experience.
The company decided to implement sharding to distribute their user and product databases across multiple servers. Here's a summary of their approach:
// Sharding user database by user ID
sh.enableSharding("ecommerceDB");
sh.shardCollection("ecommerceDB.users", {"userID": "hashed"});

// Sharding product database by product category
sh.shardCollection("ecommerceDB.products", {"category": 1});
// Adding shards
sh.addShard("shard1/mongo1:27017");
sh.addShard("shard2/mongo2:27017");
sh.addShard("shard3/mongo3:27017");
Post-sharding, the platform saw a significant improvement in query performance, with search and transaction processing times decreasing by over 50%. This performance boost allowed them to scale effortlessly and provide a seamless user experience even during high traffic periods.
A social media company was facing an exponential increase in data volume, resulting in storage limitations and performance degradation for user feeds and notifications.
To address these issues, they adopted a sharded MongoDB architecture. Here's a breakdown of their strategy:
Data Segmentation: Given the high frequency of feed updates and notifications, they segmented data by geographic regions to reduce latency and ensure load distribution.
Selecting Appropriate Shard Keys:
// Sharding feeds by region code
sh.enableSharding("socialMediaDB");
sh.shardCollection("socialMediaDB.feeds", {"regionCode": 1});

// Sharding notifications by user ID
sh.shardCollection("socialMediaDB.notifications", {"userID": "hashed"});
// Setting up mongos
mongos --configdb configReplSetName/configServer1:27019,configServer2:27019,configServer3:27019
After sharding, the platform handled data scale more efficiently, with loading times for feeds and notifications improving by 70%. The distributed architecture allowed them to add new regions effortlessly and maintain a consistent user experience worldwide.
A financial services firm needed to manage massive datasets for real-time fraud detection and transaction processing, encountering latency issues and data replication delays.
They opted for sharding to distribute their enormous datasets and ensure high availability. Here's their step-by-step approach:
Detailed Data Analysis: They categorized data into transactional records and user activity logs to discern the best shard key.
Shard Key Selection: They chose timestamps for transactional records to partition data based on time periods and user IDs for activity logs.
// Sharding transactions by timestamp
sh.enableSharding("financeDB");
sh.shardCollection("financeDB.transactions", {"timestamp": 1});

// Sharding user logs by userID
sh.shardCollection("financeDB.userLogs", {"userID": "hashed"});
# Configuring replica sets for each shard
replicaSetConfig = {
   _id : "shard1",
   members: [
      {_id : 0, host : "shard1host1:27017"},
      {_id : 1, host : "shard1host2:27017"},
      {_id : 2, host : "shard1host3:27017", arbiterOnly: true}
   ]
}
rs.initiate(replicaSetConfig);
Through sharding, the firm achieved real-time processing capabilities with a 60% reduction in latency. The system's scalability improved, allowing them to handle peak financial transactions smoothly while maintaining robust fraud detection.
These case studies demonstrate the transformative impact of implementing sharding in MongoDB, offering practical insights into overcoming common challenges and optimizing performance. Leveraging LoadForge for load testing proved critical in achieving a scalable, high-performing database infrastructure. By applying these lessons and strategies, your organization can also harness the power of sharding to meet growing data demands efficiently.
In this guide, we've delved deeply into the intricacies of sharding in MongoDB, covering a comprehensive range of topics to help you design, implement, and maintain a scalable MongoDB deployment. Let's recap the essential points and look at the next steps you can take to further your knowledge and skills.
To continue your journey towards mastering MongoDB scaling, consider exploring the following advanced topics and resources:
To solidify your understanding and gain practical experience, consider the following actionable steps:
By following this guide and taking these next steps, you'll be well-equipped to tackle the challenges of scaling MongoDB, ensuring your deployments are not only powerful but also resilient and efficient.
For more in-depth tutorials and resources, visit the official MongoDB documentation and stay connected with the MongoDB community. Happy scaling!
For further details on load testing with LoadForge, be sure to check out our dedicated section on using LoadForge for performance evaluation, where you can find comprehensive guides and real-world examples.