Jira Integration & Graphical Test Builder
We are proud to announce the release of two new features, available immediately. 🚀 Jira Integration: Automate Issue Tracking for...
## Introduction When it comes to running a high-performance WordPress site, the foundational technology stack plays a crucial role. Two key components of this stack are Nginx and PHP. Nginx, a high-performance HTTP server and reverse proxy, is known for...

When it comes to running a high-performance WordPress site, the foundational technology stack plays a crucial role. Two key components of this stack are Nginx and PHP. Nginx, a high-performance HTTP server and reverse proxy, is known for its ability to handle large volumes of traffic with minimal resource consumption. PHP, the server-side scripting language that powers WordPress, is where most of the dynamic content generation happens. Together, they form the backbone of your WordPress site’s server-side functionality.
However, out-of-the-box settings for Nginx and PHP might not be optimal for a busy WordPress site. To extract the best performance, fine-tuning these settings is essential. From reducing page load times to ensuring stable operation under heavy traffic, these tweaks can have a substantial impact.
In this guide, we'll delve into why tweaking Nginx and PHP settings can make a significant difference. You'll learn how to optimize your server environment for WordPress, striking a perfect balance between performance and resource utilization.
Below, you'll find a deeper exploration into the varied aspects of enhancing your WordPress site's performance through targeted Nginx configurations, PHP adjustments, and additional techniques. We'll also discuss how to monitor these improvements effectively using LoadForge, ensuring your site can handle high traffic loads without a hitch.
Stay tuned to transform your WordPress site from just functional to exceptionally fast and reliable.
## Why Performance Matters

In today's digital age, website performance is a critical factor that can make or break your online presence. For WordPress sites, performance is not merely about faster loading times; it directly influences user experience, search engine optimization (SEO), and conversion rates. Below, we delve deeper into why performance matters and how it affects these crucial aspects.

### Impact on User Experience

A fast-loading website ensures a smooth and enjoyable user experience. Research indicates that users expect web pages to load in under 3 seconds; any delay can lead to user frustration:

- **Bounce Rate**: Slow websites have higher bounce rates, meaning users leave your site without interacting with it. This can hurt your engagement metrics and reduce user retention.
- **User Satisfaction**: Faster websites create a sense of reliability and professionalism, which translates to better user satisfaction and, ultimately, a stronger brand reputation.

### Influence on SEO

Google and other search engines prioritize faster websites in their ranking algorithms. Here's why:

- **Crawling Efficiency**: Faster websites are easier for search engines to crawl, index, and rank. This can help in the more frequent and comprehensive indexing of your web pages.
- **Core Web Vitals**: Google uses metrics like Largest Contentful Paint (LCP), First Input Delay (FID), and Cumulative Layout Shift (CLS) to assess page performance. Better Web Vitals positively impact your search rankings.

### Conversion Rates

E-commerce websites and sites relying on user conversions need to pay extra attention to performance:

- **Reduced Cart Abandonment**: Fast load times can significantly lower shopping cart abandonment rates, leading to more completed transactions.
- **Increased Conversions**: Even a one-second delay in page load time can result in a significant drop in conversions. Ensuring your website is optimized can lead to higher sales, sign-ups, and engagement.

### A Practical Example

Consider a WordPress-based online store. A faster site means:

<pre><code>
- More quick and more efficient navigation across product pages.
- Reduced downtime, ensuring that promotional campaigns reach a broader audience without server lag.
- Capacity to handle higher traffic during peak times, such as sales or holidays.
</code></pre>

By tweaking your PHP settings and optimizing your Nginx configuration, you can achieve the performance enhancements essential for these benefits.

### Conclusion

Performance isn't just an optional improvement; it's a business-critical factor. Whether you're focused on user experience, SEO, or conversion rates, optimizing your WordPress site's performance will contribute to your long-term success. Keep this importance in mind as we move forward to discuss specific configurations and tweaks to help you achieve these performance goals.
This section clarifies why website performance is essential and sets the stage for the subsequent technical guides on optimizing Nginx and PHP settings to enhance a WordPress site's performance.
Configuring Nginx correctly is crucial for optimizing your WordPress site's performance. This section details the essential settings and directives needed to get the most out of your Nginx setup.
Begin with a minimal Nginx configuration optimized for WordPress:
user www-data;
worker_processes auto;
pid /run/nginx.pid;
include /etc/nginx/modules-enabled/*.conf;

events {
    worker_connections 1024;
}

http {
    sendfile on;
    tcp_nopush on;
    tcp_nodelay on;
    keepalive_timeout 65;
    types_hash_max_size 2048;

    include /etc/nginx/mime.types;
    default_type application/octet-stream;

    # Logging options
    access_log /var/log/nginx/access.log;
    error_log /var/log/nginx/error.log;

    gzip on;
    gzip_disable "msie6";
    gzip_vary on;
    gzip_proxied any;
    gzip_comp_level 6;
    gzip_buffers 16 8k;
    gzip_http_version 1.1;
    gzip_types text/plain text/css application/json application/javascript text/xml application/xml application/xml+rss text/javascript;

    include /etc/nginx/conf.d/*.conf;
    include /etc/nginx/sites-enabled/*;
}
For WordPress-specific enhancements, you’ll need to modify your server block configuration. Here's a basic server block tailored for WordPress:
server {
    listen 80;
    server_name yourdomain.com;
    root /var/www/wordpress;

    index index.php index.html index.htm;

    location / {
        try_files $uri $uri/ /index.php?$args;
    }

    location ~ \.php$ {
        include snippets/fastcgi-php.conf;
        fastcgi_pass unix:/var/run/php/php7.4-fpm.sock;
        fastcgi_param SCRIPT_FILENAME $document_root$fastcgi_script_name;
        include fastcgi_params;
    }

    location ~* \.html$ {
        expires 1h;
        access_log off;
    }

    location ~* \.(css|js|jpg|jpeg|gif|png|svg|ico|webp)$ {
        expires max;
        log_not_found off;
    }

    location ~* /\. {
        deny all;
    }
}
Cache static content to improve load times for repeat visitors:
location ~*  \.(jpg|jpeg|png|gif|ico|css|js)$ {
    expires 365d;
}
Enabling Gzip compression reduces the size of transmitted data:
gzip on;
gzip_min_length 256;
gzip_comp_level 5;
gzip_types text/plain text/css application/json application/javascript text/xml application/xml application/xml+rss text/javascript;
Optimize buffer settings to handle large requests efficiently:
client_body_buffer_size 10K;
client_header_buffer_size 1k;
client_max_body_size 8m;
large_client_header_buffers 2 1k;
Add basic security directives to protect your WordPress site:
server_tokens off;

location ~ /\.ht {
    deny all;
}
Redirect HTTP to HTTPS and configure SSL settings as per best practices:
server {
    listen 80;
    server_name yourdomain.com;
    return 301 https://$host$request_uri;
}

server {
    listen 443 ssl;
    server_name yourdomain.com;

    ssl_certificate /etc/nginx/ssl/yourdomain.com.crt;
    ssl_certificate_key /etc/nginx/ssl/yourdomain.com.key;

    ssl_protocols TLSv1.2 TLSv1.3;
    ssl_ciphers 'ECDHE-ECDSA-CHACHA20-POLY1305:...';

    ...
}
With these essential Nginx settings and directives, your WordPress site can achieve optimal performance and better handle high traffic. Once you’ve configured Nginx correctly, you’ll notice a significant improvement in speed and responsiveness. For continued performance monitoring and load testing, consider using LoadForge to ensure your configurations can sustain high traffic efficiently.
PHP-FPM (FastCGI Process Manager) is a robust and efficient method for handling PHP processes, making it perfect for high-traffic WordPress sites. In this section, we’ll walk through the installation and configuration of PHP-FPM to work seamlessly with Nginx and WordPress.
First, you need to install PHP-FPM. The method varies slightly depending on your server's operating system. Here’s how to install it on Ubuntu/Debian and CentOS/RHEL:
Open your terminal and run the following commands:
sudo apt update
sudo apt install php-fpm
sudo yum install epel-release
sudo yum install php-fpm
Once PHP-FPM is installed, you need to tweak its configuration to ensure optimal performance.
The main configuration file for PHP-FPM is usually located at /etc/php-fpm.conf or /etc/php/7.4/fpm/php-fpm.conf depending on your PHP version. Additionally, pool configurations are found in the /etc/php-fpm.d/ directory or /etc/php/7.4/fpm/pool.d/.
Open the primary PHP-FPM configuration file in a text editor:
sudo nano /etc/php/7.4/fpm/php-fpm.conf # Adjust this path as necessary
Ensure that the following settings are enabled:
; Determines if PHP-FPM should start as a daemon
daemonize = yes

; Set the error log file location
error_log = /var/log/php-fpm/error.log
Next, configure the pool settings to optimize performance. By default, there's a pool called www.conf located in /etc/php/7.4/fpm/pool.d/www.conf. Adjust these settings:
sudo nano /etc/php/7.4/fpm/pool.d/www.conf
Make sure to set the following:
[www]
; Unix user/group of processes
user = www-data
group = www-data

; Choose how the process manager will control the number of child processes (dynamic is recommended)
pm = dynamic

; The number of child processes is set dynamically based on the following settings
pm.max_children = 50
pm.start_servers = 5
pm.min_spare_servers = 5
pm.max_spare_servers = 35

; Path to the ping file
ping.path = /ping

; Access log
access.log = /var/log/php-fpm/$pool.access.log
To enable Nginx to pass PHP requests to PHP-FPM, you need to adjust the Nginx server block configuration for your WordPress site.
Open your Nginx configuration:
sudo nano /etc/nginx/sites-available/yourdomain.com
Add or ensure the following directives within your server block:
server {
    listen 80;
    server_name yourdomain.com;

    root /var/www/yourdomain.com/public_html;
    index index.php index.html index.htm;

    location / {
        try_files $uri $uri/ =404;
    }

    location ~ \.php$ {
        include snippets/fastcgi-php.conf;
        fastcgi_pass unix:/run/php/php7.4-fpm.sock; # Adjust as necessary
        fastcgi_param SCRIPT_FILENAME $document_root$fastcgi_script_name;
        include fastcgi_params;
    }

    location ~ /\.ht {
        deny all;
    }
}
Ensure the PHP-FPM socket matches the one specified in the fastcgi_pass directive. Reload both PHP-FPM and Nginx for the changes to take effect:
sudo systemctl restart php7.4-fpm
sudo systemctl restart nginx
Once everything is configured, create a test PHP file in your WordPress directory to ensure PHP-FPM is working correctly:
echo "<?php phpinfo();" > /var/www/yourdomain.com/public_html/info.php
Visit http://yourdomain.com/info.php in your web browser. If the PHP information page loads, your PHP-FPM setup is working perfectly. Don’t forget to delete the info.php file afterward to prevent unauthorized access.
rm /var/www/yourdomain.com/public_html/info.php
By following these steps, you have successfully set up PHP-FPM to work in conjunction with Nginx and WordPress, significantly enhancing your site's performance.
PHP configuration plays a crucial role in the performance of a WordPress site. By fine-tuning settings related to memory limits, execution times, and OPcache, you can significantly enhance the speed and responsiveness of your site.
The memory limit for PHP scripts can significantly affect the performance of your WordPress site. If this limit is too low, it can cause scripts to fail, especially those that are resource-intensive.
To adjust the PHP memory limit, you need to modify the php.ini file:
sudo nano /etc/php/7.x/fpm/php.ini
Search for the memory_limit directive and increase its value. A common setting for WordPress is 256M, but this can vary based on your specific needs.
memory_limit = 256M
After making this change, restart PHP-FPM to apply the new settings:
sudo systemctl restart php7.x-fpm
Long-running scripts can be stopped by PHP if they exceed the max_execution_time. Increasing this limit can help prevent timeouts during intensive processes such as plugin management or content imports.
Again, edit the php.ini file and locate the max_execution_time directive:
max_execution_time = 300
Setting this to 300 seconds is typically sufficient for most needs, but you can adjust it as necessary.
Restart PHP-FPM to apply the changes:
sudo systemctl restart php7.x-fpm
OPcache is a powerful tool that caches precompiled script bytecode in memory, reducing the time needed to load and execute PHP scripts. Enabling and configuring OPcache can yield a significant performance boost for your WordPress site.
First, ensure OPcache is installed. You can verify this using:
php -v
You should see something like with Zend OPcache. If it’s not installed, you can add it using your package manager:
sudo apt install php-opcache
Then, edit the OPcache settings in php.ini:
zend_extension=opcache.so
opcache.enable=1
opcache.memory_consumption=128
opcache.max_accelerated_files=10000
opcache.revalidate_freq=240
opcache.validate_timestamps=1
Here's a brief explanation of these settings:
opcache.memory_consumption: The maximum amount of memory OPcache can use. 128M is a good starting point.opcache.max_accelerated_files: The maximum number of files to cache. 10000 covers most WordPress installations.opcache.revalidate_freq: How often to check for script updates (in seconds). Setting this to 240 balances performance with ensuring updated files are loaded.opcache.validate_timestamps: Whether to check file timestamps to detect changes. Set this to 1 for a production environment.Restart PHP-FPM to apply OPcache settings:
sudo systemctl restart php7.x-fpm
Fine-tuning your PHP configuration can lead to noticeable improvements in WordPress performance. By adjusting memory limits, execution times, and enabling OPcache, you ensure that your site is optimized to handle higher loads and deliver faster response times. While these tweaks are essential, remember that they form just one part of a comprehensive performance optimization strategy for your WordPress site.
Caching is one of the most effective techniques for enhancing the performance of your WordPress site. By storing copies of frequently accessed content and serving these cached versions to users, you can significantly reduce the load on your server and improve page load times. Nginx offers robust caching mechanisms such as fastcgi_cache and proxy_cache, both of which can be configured to provide substantial performance gains.
The fastcgi_cache directive in Nginx is specifically optimized for caching dynamic content generating by FastCGI processes. For a WordPress site, this means caching the PHP-generated pages that remain the same between requests. Below are the steps to configure fastcgi_cache:
Define Cache Path and Keys:
First, define the cache path and keys in the http block of your Nginx configuration file:
http {
     fastcgi_cache_path /var/cache/nginx levels=1:2 keys_zone=WORDPRESS:100m inactive=60m;
     fastcgi_cache_key "$scheme$request_method$host$request_uri";
 }
Modify Server Block:
Next, update your server block to include the fastcgi_cache directives:
server {
     location ~ \.php$ {
         include fastcgi_params;
         fastcgi_pass unix:/var/run/php/php7.4-fpm.sock;

         fastcgi_cache WORDPRESS;
         fastcgi_cache_valid 200 60m;
         fastcgi_cache_bypass $skip_cache;
         fastcgi_no_cache $skip_cache;
     }
 }
Add conditions to determine when to cache and when to bypass the cache:
set $skip_cache 0;

 if ($request_method = POST) {
     set $skip_cache 1;
 }
 if ($query_string != "") {
     set $skip_cache 1;
 }
 if ($request_uri ~* "/wp-admin/|/wp-login.php") {
     set $skip_cache 1;
 }
Clear Cache:
Occasionally, you might need to clear the cache. You can do this manually by deleting files in the cache directory or setting up a script to handle it programmatically.
The proxy_cache directive is typically used when Nginx is acting as a reverse proxy, forwarding requests to another server. This can be beneficial if you are handling a large volume of requests or balancing load across multiple back-end servers.
Define Cache Path and Keys:
Set up the proxy_cache_path and keys in the http block:
http {
     proxy_cache_path /var/cache/nginx levels=1:2 keys_zone=WORDPRESS:100m inactive=60m;
     proxy_cache_key "$scheme$request_method$host$request_uri";
 }
Modify Server Block:
Implement the proxy_cache directives in your server block:
server {
     location / {
         proxy_pass http://backend_server;
         proxy_set_header Host $host;
         proxy_set_header X-Real-IP $remote_addr;

         proxy_cache WORDPRESS;
         proxy_cache_valid 200 60m;
         proxy_cache_bypass $http_cache_control;
         proxy_no_cache $http_cache_control;
     }
 }
This configuration directs Nginx to cache responses from the backend server and bypass the cache if special headers, such as Cache-Control, are detected in the request.
Both fastcgi_cache and proxy_cache are powerful caching techniques provided by Nginx that can substantially enhance the performance of your WordPress site. By intelligently caching dynamic content and reducing the load on your servers, these methods can help you achieve faster response times and a more scalable architecture. Make sure to tailor these settings to your specific use case and monitor their effectiveness with tools like LoadForge to ensure optimal performance under various load conditions.
Integrating a Content Delivery Network (CDN) into your WordPress site is a highly effective strategy for enhancing performance by offloading static content and reducing server load. CDNs work by distributing your site's static assets—such as images, CSS files, JavaScript, and videos—across multiple global servers, ensuring that users can download these resources from a geographically closer location.
Using a CDN provides multiple benefits:
Setting up a CDN involves a few essential steps, which can be broken down into the following:
Choose a CDN Provider: Many reputable CDN providers are available, such as Cloudflare, MaxCDN (now part of StackPath), and Amazon CloudFront. Choose one based on your needs and budget.
Configure CDN Settings: Once you sign up with a CDN provider, you'll need to configure your account and set up a pull zone, which will fetch and cache your static files.
Update DNS Settings: Modify your domain's DNS settings to route traffic through the CDN. This typically involves changing your domain's nameservers to those provided by your CDN provider.
Install a WordPress Plugin: To integrate the CDN with your WordPress site, you can use a plugin like W3 Total Cache or WP Rocket, which simplifies the process. These plugins will help rewrite the URLs of your static resources to point to the CDN.
Here’s how you can configure a CDN using the W3 Total Cache plugin:
Install and Activate W3 Total Cache: Navigate to Plugins > Add New, search for "W3 Total Cache," install, and activate the plugin.
Configure CDN Settings: Go to Performance > General Settings. In the CDN section, check the "Enable" box and select your CDN provider from the dropdown.
Enter CDN Information: Click on the Performance > CDN menu. Enter the CDN hostname and credentials as required by your CDN provider.
Save and Test: Save your settings and purge all caches. Visit your site and use developer tools to ensure that static assets are now being served from the CDN.
cdn.example.com/wp-content/uploads/2023/01/image.jpg
Cache-Control headers to manage the expiration of cached content effectively.By seamlessly integrating a CDN with your WordPress site, you will critically enhance its performance. This not only improves user experience but also contributes to better SEO rankings and increased conversion rates by ensuring your content loads quickly and reliably from anywhere in the world.
## Optimizing Database Performance

Enhancing the database performance is crucial for maintaining a swift and responsive WordPress site. A slow database can be a significant bottleneck, detracting from user experience and potentially affecting your site's SEO. In this section, we'll cover essential tips for optimizing your WordPress database, including proper indexing, query optimization, and utilizing caching plugins.

### Proper Indexing

Proper indexing ensures that your database can retrieve the needed information quickly. Indexes should be carefully crafted to improve the performance of frequently executed queries. Here's how you can ensure effective indexing:

1. **Identify Slow Queries**: Use tools like `MySQL Slow Query Log` or WordPress plugins like Query Monitor to identify queries that take longer to execute.
2. **Create Indexes**: Add indexes to columns that are often used in `WHERE`, `JOIN`, and `ORDER BY` clauses. Here's an example of adding an index to a column:

    ```sql
    CREATE INDEX idx_post_id ON wp_posts(post_id);
    ```

3. **Monitor Index Impact**: Use `EXPLAIN` on your queries to examine how indexes are being used and ensure they are beneficial.

    ```sql
    EXPLAIN SELECT * FROM wp_posts WHERE post_id = 1;
    ```

### Query Optimization

Optimizing SQL queries is another critical step. Efficient queries reduce the load on your database server and enhance overall performance.

1. **Avoid SELECT ***: Rather than selecting all columns, specify only the columns you need to reduce the amount of data processed:

    ```sql
    SELECT post_title, post_date FROM wp_posts WHERE post_id = 1;
    ```

2. **Use Prepared Statements**: They not only enhance performance but also help prevent SQL injection attacks.

    ```php
    $stmt = $wpdb->prepare("SELECT post_title FROM wp_posts WHERE post_id = %d", $post_id);
    $result = $wpdb->get_var($stmt);
    ```

3. **Limit Query Results**: Use `LIMIT` to restrict the number of rows returned, especially useful in paginated content:

    ```sql
    SELECT post_title FROM wp_posts ORDER BY post_date DESC LIMIT 10;
    ```

### Using Caching Plugins

Caching plugins can significantly reduce the number of database queries, offloading traffic from your database and improving response times.

1. **Object Caching**: Plugins like `W3 Total Cache` or `Redis Object Cache` store database query results in memory for quicker retrieval.

2. **Query Caching**: Use plugins to cache results of complex and frequently run queries. This can dramatically reduce load times.

    ```php
    $query_result = wp_cache_get('my_custom_query');
    if (!$query_result) {
        // Run the query because it isn't cached
        $query_result = new WP_Query($args);
        // Cache the result for future use
        wp_cache_set('my_custom_query', $query_result, '', 3600);
    }
    ```

### Database Cleanup

Regularly cleaning up your WordPress database helps in removing unnecessary data and improving performance.

1. **Delete Transient Options**: Remove expired transients using SQL or plugins like `WP-Optimize`.

    ```sql
    DELETE FROM wp_options WHERE option_name LIKE '_transient_%' AND option_value < UNIX_TIMESTAMP();
    ```

2. **Remove Spam and Trash**: Keep your database clean by regularly purging spam comments and trash posts.

    ```sql
    DELETE FROM wp_comments WHERE comment_approved = 'spam';
    DELETE FROM wp_posts WHERE post_status = 'trash';
    ```

By applying these strategies, you can ensure that your WordPress site's database remains efficient and responsive, thereby improving the overall performance of your website.
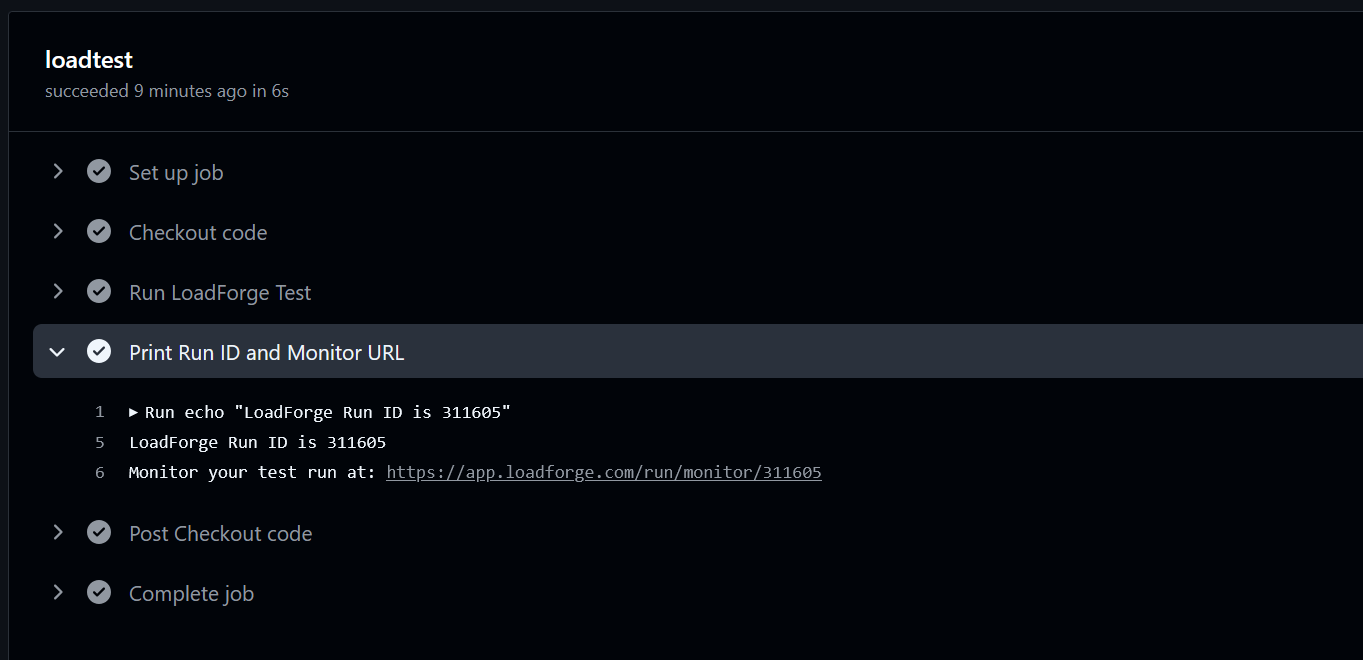
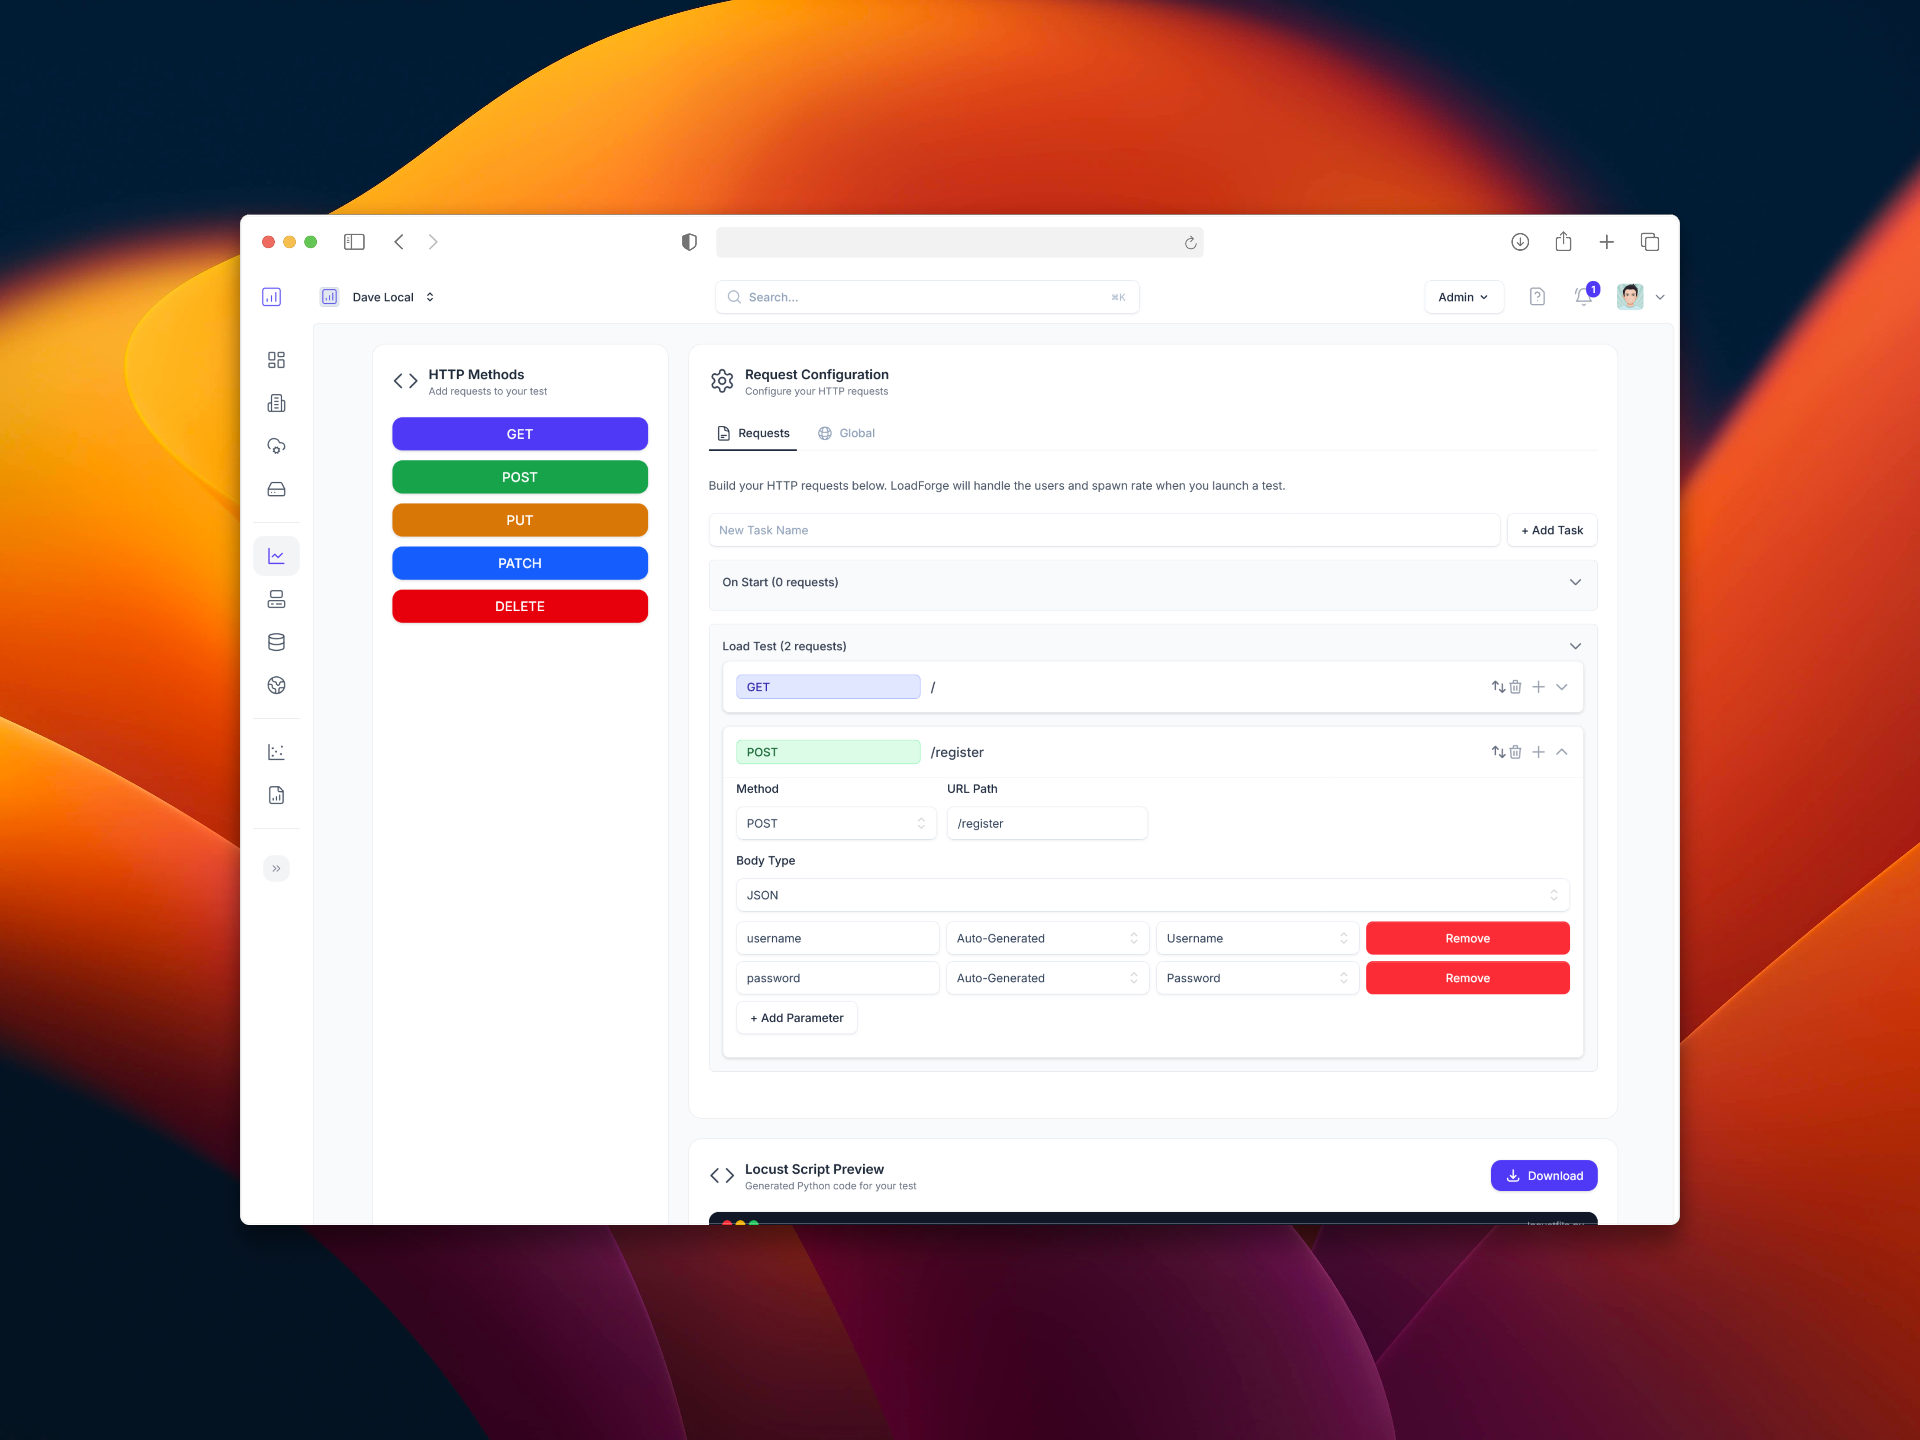
In the realm of web performance optimization, understanding how your WordPress site performs under different types of traffic is crucial. This is where LoadForge comes into play, providing an essential toolkit for monitoring and load testing. By leveraging LoadForge, you can ensure that your WordPress site handles high traffic efficiently, maintains quick response times, and delivers a seamless user experience even during peak loads.
Load testing simulates concurrent user access to a site, helping to identify bottlenecks, weak points, and potential failure thresholds. It answers questions like:
By addressing these questions, you can tune your Nginx and PHP settings more effectively, ensuring that performance optimizations are not just theoretical but backed by real-world data.
Setting up LoadForge for your WordPress site is straightforward. Follow these steps to begin:
Sign Up and Create a Project:
Define Your Test Plan:
- url: "https://yourwordpresssite.com"
  method: "GET"
  headers:
    User-Agent: "LoadForgeBot"
  variables:
    users: "100"
    rampTime: "60s"
    duration: "10m"
Specify Scenarios:
Once you've defined your test plan, you can start the load test:
loadforge run --project wordpress-site --plan test-plan.yaml
Keep an eye on the real-time metrics provided by LoadForge, such as response times, error rates, and throughput. These metrics give you immediate feedback on how your site is performing under load.
Post-test, LoadForge provides detailed reports and visualizations to help you understand the performance profile of your site. Key metrics to look for include:
For continuous performance monitoring, consider integrating LoadForge tests into your CI/CD pipeline. This ensures that performance regressions are caught early in the development cycle. Here’s an example using GitHub Actions:
name: Load Test
on: [push]
jobs:
  load-test:
    runs-on: ubuntu-latest
    steps:
      - name: Checkout code
        uses: actions/checkout@v2
      - name: Run Load Test
        run: |
          loadforge run --project wordpress-site --plan test-plan.yaml
        env:
          LOADFORGE_API_KEY: ${{ secrets.LOADFORGE_API_KEY }}
By using LoadForge for monitoring and load testing, you gain invaluable insights into how well your WordPress site can handle traffic, ensuring that your performance tweaks deliver tangible improvements. This not only enhances the user experience but also helps maintain high levels of satisfaction and engagement on your site.
Dive deeper into each metric and continuously monitor to make sure that your adjustments lead to an ever-improving, high-performance WordPress site.
When optimizing your WordPress site for performance, it's equally crucial to focus on security. Enhancing Nginx and PHP settings can protect your website from various threats without adversely affecting performance. Below are some essential security recommendations for Nginx and PHP configurations.
Nginx can be configured to limit exposure to common web vulnerabilities by tightening up server and file access settings.
Prevent access to sensitive files such as wp-config.php, .htaccess, and other configuration or backup files with the following rules:
location ~* /(\.htaccess|\.git|\.env|\.svn|.*\.db|wp-config\.php) {
    deny all;
}
Whitelist only the necessary HTTP methods and drop anything that looks suspicious:
if ($request_method !~ ^(GET|POST|HEAD)$) {
    return 405;
}
Hide the Nginx version number in HTTP headers to make it harder for attackers to identify potential vulnerabilities:
server_tokens off;
Properly configured PHP settings decrease the attack surface of your WordPress installation.
Disable PHP functions that are rarely needed but often exploited:
disable_functions = exec,passthru,shell_exec,system,proc_open,popen,curl_exec,curl_multi_exec,parse_ini_file,show_source
Set reasonable limits for maximum execution time and memory usage to prevent certain types of attacks:
max_execution_time = 30
memory_limit = 128M
Displaying errors on the front end can expose sensitive information. Disable it and enable error logging instead:
display_errors = Off
log_errors = On
error_log = /var/log/php_errors.log
Ensure all data between the user and your server is encrypted by configuring HTTPS. Using services like Let's Encrypt makes implementation straightforward:
server {
    listen 443 ssl;
    server_name yourdomain.com;

    ssl_certificate /path/to/your_certificate.crt;
    ssl_certificate_key /path/to/your_private.key;

    # Other SSL settings
    ssl_protocols TLSv1.2 TLSv1.3;
    ssl_ciphers HIGH:!aNULL:!MD5;
    ssl_prefer_server_ciphers on;
}
Adding security-related headers can protect against a range of attacks, such as Clickjacking, XSS, and data injection:
add_header X-Frame-Options "SAMEORIGIN";
add_header X-Content-Type-Options "nosniff";
add_header X-XSS-Protection "1; mode=block";
add_header Strict-Transport-Security "max-age=31536000; includeSubDomains; preload" always;
Applying these security settings in your Nginx and PHP configurations creates robust protection for your WordPress site while maintaining optimal performance. Balancing security and performance ensures reliable, fast, and secure user experiences.
In this guide, we have explored various techniques and settings to optimize the performance of your WordPress site by tweaking Nginx and PHP. Enhancing your website’s performance can improve user experience, SEO ranking, and conversions. Let's summarize the key points covered:
Nginx Configuration for WordPress:
 server {
     listen 80;
     server_name example.com;
     root /var/www/html;
     index index.php index.html index.htm;

     location / {
         try_files $uri $uri/ /index.php?$args;
     }

     location ~ \.php$ {
         include snippets/fastcgi-php.conf;
         fastcgi_pass unix:/var/run/php/php7.4-fpm.sock;
     }

     location ~ /\.ht {
         deny all;
     }
 }
Setting Up PHP-FPM:
Tweaking PHP Settings:
 memory_limit = 256M
 max_execution_time = 60
 opcache.enable=1
 opcache.memory_consumption=128
 opcache.interned_strings_buffer=8
 opcache.max_accelerated_files=4000
Recommended Nginx Caching Techniques:
fastcgi_cache and proxy_cache can drastically reduce load times.
fastcgi_cache_path /etc/nginx/cache levels=1:2 keys_zone=PHP_CACHE:10m inactive=60m;
Utilizing Content Delivery Networks (CDN):
Optimizing Database Performance:
Monitoring and Load Testing with LoadForge:
Security Considerations:
By implementing these tweaks and configurations, you will enhance the performance, security, and reliability of your WordPress site. For continuous monitoring and ensuring your optimizations are effective, regularly use tools like LoadForge for load testing. Start optimizing today and experience the improvements in user engagement and overall site performance!